Preface

Not long ago, I bought a Huawei P9 and planned to use it as a backup phone. However, China Telecom's 2G network was withdrawn, and while surfing the Internet, I found that I could modify the configuration file to enable VoLTE. I hadn't messed with my phone for a long time, so I decided to give it a try. (Back up your files in advance! Back up your files in advance! Back up your files in advance!)

Huawei P9 (EVA-AL)

Android version 8.0.0

EMUI version 8.0.0

Prepare

Approximate process: https://www.bilibili.com/BV1Ly4y1u7YE

adb environment (it is recommended to use Machine Toolbox, you can add the file directory to the environment variable to facilitate the follow-up)

Turn on USB debugging on the phone and connect to the computer.

Unlock BootLoader

Huawei's default bootloader is locked, and you can only use official firmware for system updates. Moreover, Huawei has closed the application channel for unlocking codes in 2018 and cannot be unlocked through official channels.
You can try this method https://www.52pojie.cn/thread-816065-1-1.html, or use Taobao’s local unlock code.
After obtaining the unlock, enter the command to unlock BootLoader:

adb reboot bootloader
fastboot oem unlock your unlock code

Confirm on the mobile phone and wait for the phone to restart.

Flash into TWRP

Recovery is a mode provided by Android phones that can modify the data or system inside the phone. However, the original version provides fewer functions. Here we use the TWRP third-party Recovery tool.
TWRP download address: https://github.com/dreamrover/honor8 (TWRP is available for Honor 8).
After the download is complete, flash TWRP:

adb reboot bootloader
fastboot flash recovery_ramdisk twrp-3.2.1-0.img
fastboot reboot

(Some netizens reported that they may not be able to boot the computer in the future. The second command was replaced by

fastboot flash recovery_ramdisk huawei-honor-8-em8_0-twrp3.2.1-7to-recovery-8.5.18.img

And decrypt Data partition in advanced features. )

Flash into Magisk

Magisk mask is an Android system framework that can obtain root permissions of the device and other functions. (Those who used to play flash machine didn’t seem to have this thing)
Download address: https://github.com/topjohnwu/Magisk/releases
Enter the TWRP main interface on your phone and click "Advanced" -> ADB Sideload -> Slide the button to start Sideload
Computer input:

adb sideload Magisk-v26.4.apk
adb reboot

If nothing else goes wrong, there will be an extra Magisk after restarting the phone. After opening it, it is found that Root is successful.

question

After root is successful, use the RE file modifier to enter the /system/vendor/ directory, modify build.prop, and find ro.config.hw_volte_on=true, the next line
ro.config.hw_volte_dyn=false, save the file and exit, restart the phone. The VoLTE switch is out, but it cannot be used.
Maybe the model is still too old. . . . At least Root succeeded.

refer to

https://www.txrjy.com/thread-1053358-1-1.html
https://github.com/dreamrover/honor8
https://www.jianshu.com/p/5b63b1bc66bd

DAPP development using MetaMask API in Vue is invalid
Vue version 3.2.25
MetaMask version 10.8.1
Chromium version 90.0.4430.93 (official version) (64-bit)
Use mounted to get

mounted() {
console.log(window.ethereum.selectedAddress);
},

The result is:

0x348f....

But after using npm run bulid

null

further testing

mounted() {
console.log(typeof window.ethereum);
console.log(window.ethereum);
console.log(window.ethereum.selectedAddress)
},
object
Proxy {_events: {…}, _eventsCount: 1, _maxListeners: 100, _log: u, _state: {…}, …}
null

But there is no such problem in the browser console

ethereum
Proxy {_events: {…}, _eventsCount: 1, _maxListeners: 100, _log: u, _state: {…}, …}
ethereum.selectedAddress
"0x348fd452409cf4dd75027394394bef9ec2f09213"

The guess is that it takes a certain amount of time for MetaMask to obtain selectedAddress, and there is a problem with the order of execution. However, the Vue life cycle seems to have hooks before Mounted and after mounted.
Final solution Promise:

mounted() {
console.log(typeof window.ethereum);
console.log(window.ethereum);
//Asynchronously implement browser MetaMask API post-loading issues
this.sleep(500).then(() => {
// console.log(window.ethereum.selectedAddress);
})
},
methods: {
//Asynchronously implement browser MetaMask API post-loading issues
sleep(time) {
return new Promise((resolve) => setTimeout(resolve, time));
}
}

As for why there is no such problem in dev:
dev

30 requests
10.2 MB transferred
10.2 MB resources
Finish: 896 ms
DOMContentLoaded: 800 ms
Load: 907 ms

build

0 requests
2.0 MB transferred
2.0 MB resources
Finish: 813 ms
DOMContentLoaded: 295 ms
Load: 420 ms

Perhaps too many dependencies under dev just give metamask enough time to take effect.
In other words, if there are enough dependencies after build or the metamask is fast enough, after the website is online and the network delay is added, will this problem disappear? . .

Typecho edible: security certification, comment filtering, emoji support and CDN

safety certificate

Just add the following code to your theme’s “footer.php”

<div id="cc-myssl-id" style="position: fixed;right: 0;bottom: 0;width: 65px;height: 65px;z-index: 99;">;
<a href="http:abc.com" target="_blank" rel="nofollow noopener noreferrer">;
<img src="https://static.myssl.com/res/images/myssl-id.png" target="_blank" rel="nofollow noopener noreferrer" alt="Secure" style="width:100%; height:100%">;
</a>;
</div>;

Comment filtering

I don’t know how a foreigner discovered the website (maybe a plug-in installed left a backdoor). The most frequent comment I remember was more than 200 comments in one afternoon, basically all of which were messy lottery tickets. When I came back, I found a good one. Plug-in SmartSpam, intercepted the robot (when I came back, I found that no one except the robot commented at all😅). The plug-in can directly block the commenter's IP, set banned words and sensitive words, limit the minimum number of words to be entered, etc. It can be said that the function is quite powerful.

Download address: https://plugins.typecho.me/plugins/smart-spam.html

emoji support

MySQL's utf8 encoding does not support emoji. We can just change the encoding to utf8mb4 and the operation is very simple.

  • Enter phpmyadmin, select your database, Operation->;Organization->;Sort->;Select utf8mb4_general_ci
  • Execute the following sql statement to modify the encoding format of the table in the typecho database to utf8mb4

    alter table typecho_comments convert to character set utf8mb4 collate utf8mb4_general_ci;
    alter table typecho_contents convert to character set utf8mb4 collate utf8mb4_general_ci;
    alter table typecho_fields convert to character set utf8mb4 collate utf8mb4_general_ci;
    alter table typecho_metas convert to character set utf8mb4 collate utf8mb4_general_ci;
    alter table typecho_options convert to character set utf8mb4 collate utf8mb4_general_ci;
    alter table typecho_relationships convert to character set utf8mb4 collate utf8mb4_general_ci;
    alter table typecho_users convert to character set utf8mb4 collate utf8mb4_general_ci;
  • Modify the config.inc.php file in the root directory
    Modify the value of charset to utf8mb4

    $db = new Typecho_Db("Pdo_Mysql", "typecho_");
    $db->;addServer(array (
    ...
    "charset" =>; "utf8mb4", # Modify encoding to utf8mb4
    ...
    ), Typecho_Db::READ | Typecho_Db::WRITE);
    Typecho_Db::set($db);

    Effect:😀 😍😘😗😙😚⭐️✨ ⚡️

    Another cloud CDN

    I originally wanted to access Baidu Cloud Acceleration, but I saw that the Youpaiyouyoupai Cloud Alliance event also supports HTTPS. It provides 15GCDN traffic + 10G storage for free every month. You only need to apply for a simple review. What a coincidence. The review of the photo happens to be on Friday, so for now, I will use Youpaiyun.

    Review steps
  • First, log in or register your Youpai account
  • Complete real-name authentication: You can use Alipay’s Zhima Credit and pass with one click if you score more than 700 points
  • Add Youpaiyun LOGO and official website link at the bottom of the website you are applying for
    If you are also using typecho, you can add some content to your theme footer.php file like this

    <center>;<a href="//console.upyun.com/register/?invite=SJwxZAXNr" target="_blank">;<img src="https://lengqie.live/upyun.png" style= "width: 75px;">;</a>;
  • Go to Upyun League.
  • Complete the application form and wait for review.
    You can use it after the review is completed. Note that the CDN will be converted into vouchers and issued to your account, and the benefits will be reapplied the following year. The review time for Youpai is every Friday, and because the domestic server domain name is used, it must be filed.

    Access CDN
  • Enter the Youpai Cloud console, in CDN management, click Create CDN Service
    Service name: Create a service name, which will be used in future FTP management
    Accelerated domain name: fill in the registered domain name, such as [lengqie.live](), you can add other domain names after the creation is successful.
    Application scenario: Select web images or other types.
  • Origin site settings
    If you need to enable SSL, select HTTPS, and then fill in your original server IP address in the source site address.
  • Acceleration zone
  • CNAME resolution
    Enter the backend of your domain name service provider and resolve the CNAME to the CNAME address provided by the CDN

    CDN related settings
  • Enable HTTPS
    Find the HTTPS configuration in CDN management. You can add a free certificate or use the SSL certificate service that comes with Youpai.
  • other settings

    ConfigurationFeaturesOptions
    Cache controlCache configurationSet caching rules and non-caching rules*
    Parameter followingBack to source following
    Performance OptimizationRedirect FollowClose
    Page compressionEnable
    HTTPSTLS1.3Enable
    Access ControlCC ProtectionEnable
    WAF protectionEnable*
    CORS cross-domain sharingEnable
    Cost ControlWebP AdaptiveEnable
    H.265 AdaptiveEnable

    Cache rules: Add the first one directly, select the template as an image file, the status code is empty by default, and the cache time is 7 days
    Cache rules: The second customization, fill in /*.(js,css) in the resource path column. The status code is empty by default, and the cache time is 7 days.
    No caching rule: customized, fill in the /*.php status code in the resource path column as the default

    Related questions
  • Typecho cannot enter the background
    Cache control->;Parameter following->;Back to source following can solve this problem.

    References

    Men Hanzi"s BLOG
    Hatsunoyin

Scoop is a Windows command line installation program, similar to apt, yum, pacman, etc. under Linux.

scoop install ***

Similar software includes Chocolatey and WinGet.

Install

Make sure you have PowerShell 5 (or higher, including PowerShell Core) and .NET Framework 4.5 (or higher) installed.

Invoke-Expression (New-Object System.Net.WebClient).DownloadString("https://get.scoop.sh")
# or
iwr -useb get.scoop.sh | iex

Add application bucket

scoop bucket add extras

More buckets: https://rasa.github.io/scoop-directory/by-score.html

use

# Inquire
scoop search sudo

opi3gH.jpg

# Install
scoop install sudo
scoop install which
scoop install curl
#...

opi0PS.jpg

uninstall

scoop uninstall scoop

Download Rustup
Download address: https://www.rust-lang.org/zh-CN/tools/install
(You can also choose other versions https://forge.rust-lang.org/infra/other-installation-methods.htm

  • Download acceleration
    Open Powershell input

    $ENV:RUSTUP_DIST_SERVER="https://mirrors.ustc.edu.cn/rust-static"
    $ENV:RUSTUP_UPDATE_ROOT="https://mirrors.ustc.edu.cn/rust-static/rustup"

    f4kWi6.jpg

  • Run rustup-init.exe
    Just press Enter and install by default (using MS by default requires Visual Studio 2013 or above environment)
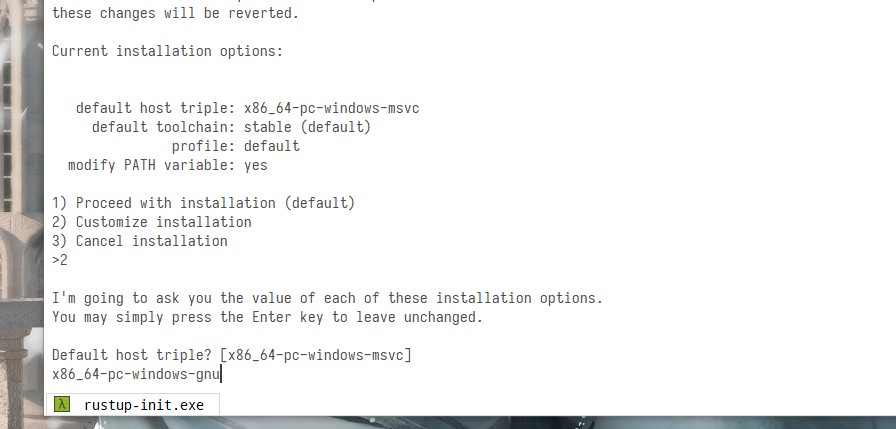
    If using MinGW + GCC compilation environment
    Need to customize the Default host triple after installation? It is x86_64-pc-windows-gnu and the rest are default.
    After setting is complete, press Enter to install.
    f4VSVs.jpg
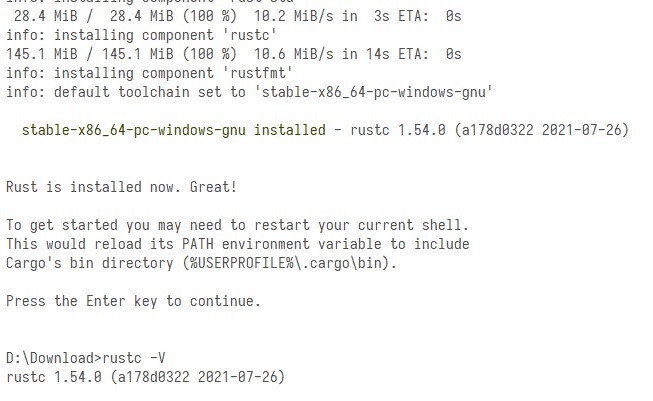
  • The installation is complete
    Use rustc -V to detect
    f4ZW0H.jpg
  • Modify environment variables

    CARGO_HOME=D:\Program\rust\.cargo
    RUSTUP_HOME=D:\Program\rust\.rustup
    PATH=%CARGO_HOME%\bin